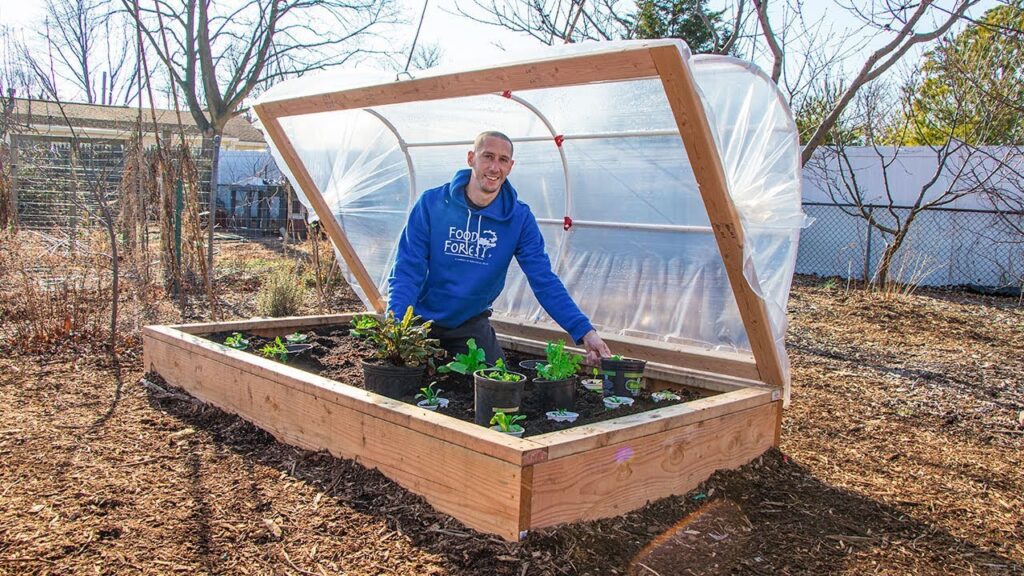
How to Build a HINGED HOOPHOUSE for a Raised Bed Garden
A hinged hoophouse is an excellent addition to any raised bed garden, offering protection from cold, wind, pests, and excessive rain while allowing easy access for planting, watering, and harvesting. Unlike traditional stationary covers, a hinged design lets you flip open the structure like a lid—no need to remove the entire frame when tending to your plants. Here’s how to build your own hinged hoophouse with affordable materials and simple tools.
Materials Needed:
- 1″x2″ lumber or similar for the frame (rot-resistant wood like cedar is ideal)
- ½” or ¾” PVC pipe (schedule 40)
- Plastic sheeting (UV-resistant greenhouse film) or frost cloth
- Pipe straps or conduit clamps
- Hinges (2-4 heavy-duty outdoor hinges)
- Screws and drill
- Optional: handles, latches, or Velcro straps
Step 1: Measure Your Raised Bed
Measure the length and width of your raised bed garden. This will determine the size of your hoophouse frame. The hoophouse should sit directly on the top edges of the bed or just slightly outside it.
Step 2: Build the Wooden Frame
Using your measurements, cut and screw together the 1×2 lumber to form a rectangular frame. This frame will act as the base of your hoophouse lid and provide structure for attaching the hoops and cover.
If your bed is very long, add a middle cross-support to prevent sagging.
Step 3: Install PVC Hoops
Cut the PVC pipe into equal lengths, long enough to form an arch over your bed. For a 4-foot-wide bed, 5-6 foot PVC lengths generally work well. Attach each end of the PVC pipe to the inside edges of the wooden frame using pipe straps or clamps, forming an arch. Space the hoops evenly—typically every 2 feet across the frame.
Three to five arches are enough for most beds, depending on length.
Step 4: Attach the Plastic Cover
Drape the plastic sheeting or frost cloth over the PVC frame. Leave a little extra on all sides so you can secure it well. Staple or tack the material to the wooden base and trim the excess. Use clamps or batten strips to stretch the plastic tight for a neat finish and improved insulation.
Step 5: Add Hinges and Secure the Frame
Position your hoophouse on top of the raised bed. On one of the long sides, attach the hinges—screw them into both the hoophouse frame and the garden bed so the structure can pivot open. Make sure the hinges are evenly spaced for stability.
On the opposite side, you can add handles for lifting and a latch or hook to keep it closed during windy conditions.
Step 6: Use and Maintain Your Hoophouse
Your hinged hoophouse is now ready to use! Open it to water, weed, and harvest. Close it during frosts, storms, or pest outbreaks. During hot days, vent the structure or prop it open to prevent overheating.
Inspect regularly for wear, especially the hinges and cover. Replace torn plastic as needed and tighten any loose screws or clamps.
With this DIY hinged hoophouse, you can extend your growing season, protect crops from extreme weather, and garden more efficiently. It’s a simple yet powerful upgrade for your raised bed!